Doodle Crash Strategies
Honest, math-based strategies for doodle-crash. No guaranteed winning systems exist — the house edge of 3.74%–4.17% is built into every round by verified SHA-256 mechanics. What this guide covers: how to use field size selection intelligently, how to set collect targets that match your bankroll, and how to avoid the common mistakes that drain sessions faster than the house edge alone.
Use this strategy page as a planning tool rather than a promise of results. Start by separating what the rules guarantee from what only changes your risk profile: stake size, cash-out target, session length, bonus terms and the pace of play. That distinction matters because a lower target or slower session can make decisions easier, but it does not remove the house edge or make a volatile round safe.
A practical strategy should feel repeatable under pressure. Before real play, test one idea in demo, keep the same stake for a short run, and notice where you feel tempted to break the plan. If a bonus is involved, check wagering terms before you adjust bet size or session length.
With that routine, the page becomes a calm checklist: clear limits, patient pacing, and fewer impulsive choices. The aim is not to outsmart randomness; it is to keep the session readable enough that you can stop on time.
Doodle Crash risk checkpoints before staking
Before you play Doodle Crash, use this page to slow the session down. Look first at crash multipliers, early cash-outs and session pacing. These are the parts of the game that usually make a balance move faster, so choose your stake and stop point before the first round or spin. A small plan is easier to follow than a complicated system, especially after a quick win or a frustrating loss.
A useful warm-up is simple: use demo rounds to test cash-out timing before adding real stakes. Keep the same stake during the test, then write down the starting balance, ending balance and whether you stopped where you planned. That short note tells you more than a lucky result because it shows whether the plan was realistic while the game was moving.
If you play with a bonus, read the wagering rules, max bet, expiry date and withdrawal limits before changing anything. The best strategy is usually the one that keeps decisions calm: clear limits, fewer rushed clicks and no attempt to win back a result that has already happened.
Understanding RTP & House Edge in Doodle Crash
Every strategic decision in doodle-crash should be grounded in the game's verified mathematical model. Doodle Crash carries an RTP of 95.83%–96.26% (average 96.05%) and a house edge of 3.74%–4.17%, as confirmed in the official game rules (version 1.0.4, dated 06.07.2023). These numbers define the long-run mathematical expectation for every player, on every field, at every bet size. No strategy alters these figures — they are built into the SHA-256 probability model that governs every round.
What RTP Actually Means for Doodle Crash Players
The Return to Player percentage of 96.05% means that for every 100 units wagered across all players over millions of rounds, doodle-crash theoretically returns 96.05 units and retains 3.95 units as house profit. This is a statistical average, not a per-session guarantee. Your personal results across 50, 100, or even 500 rounds of doodle-crash can deviate dramatically from the 96.05% average — you may finish a session up 500% or down 100%.
Three facts about doodle-crash's RTP that many players misunderstand:
- RTP is a long-run aggregate. It does not apply to your next round, your current session, or even your next month of play. The 96.05% average emerges only over tens of thousands of rounds across many players.
- RTP is not a refund rate. You will not receive 96.05% of your deposits back. Some players win multiples of their deposit; many lose their entire budget before any meaningful return.
- The 3.95% house edge is permanent and unalterable. It is built into the probability of the fake platform appearing on each level. No field choice, collect timing, or bet sizing can remove it.
Expected Value Per Round
You can calculate the mathematical expected loss on any doodle-crash bet using the house edge:
Expected Loss = Bet Size × House Edge
At 0.10 bet: 0.10 × 0.0395 = 0.00395 expected loss per round
At 1.00 bet: 1.00 × 0.0395 = 0.0395 expected loss per round
At 5.00 bet: 5.00 × 0.0395 = 0.1975 expected loss per round
Over 200 rounds at a 1.00 bet, the mathematical expectation in doodle-crash is a loss of approximately 7.90 (200 × 0.0395). Actual results will vary widely due to the variance of the platform-jumping mechanic, but 7.90 represents the average outcome if that exact 200-round session were repeated millions of times. Understanding this helps set realistic session expectations before you start.

RTP Varies Slightly by Field and Strategy
The 95.83%–96.26% RTP range in doodle-crash is not accidental — the game's house edge varies slightly depending on which field size is played and at which level players typically collect. The variation is small (0.43 percentage points across the full range) but confirms that some field-and-collect combinations are marginally more player-favorable than others. The strategies on this page account for these small differences when recommending field selection for specific play styles.
Field Size Strategy: Risk/Reward Analysis for All Five Doodle Crash Fields
The field size selection in doodle-crash is the single most important strategic decision in the game. Unlike collect timing — which is reactive — field selection is made before the round begins, with full information about the risk profile. Choosing the right field for your session goals and bankroll is the foundation of any doodle-crash strategy.
The core trade-off in doodle-crash field selection is this: fields with more columns have a lower per-jump fail rate, but fields with more levels require more consecutive successful jumps to reach the maximum multiplier. The per-jump survival rate improves as you go from 2x3 to 6x15, but the cumulative survival probability to reach the maximum multiplier decreases with more levels.
Per-Jump Fail Rate vs. Maximum Multiplier
Understanding the per-jump fail rate on each field is essential. On the 2x3 field, exactly 1 of 2 platforms per level is fake — a 50% fail chance on every jump. On the 6x15 field, exactly 1 of 6 platforms is fake — a 16.7% fail chance. However, surviving all 15 levels of the 6x15 field (each at 83.3% per-jump survival) produces a cumulative survival probability of approximately (5/6)^15 ≈ 6.5%, while surviving all 3 levels of the 2x3 field (each at 50% survival) produces (1/2)^3 = 12.5%.
Strategic Assessment of Each Field
2x3 Field (50% per jump, max x7.68): The highest-volatility option in doodle-crash. Three levels, coin-flip odds on every jump. Best suited for players who want the fastest possible rounds and are comfortable with frequent total losses. The x7.68 maximum is the lowest in the game. Avoid this field with small session budgets — the 50% fail rate will rapidly exhaust a limited bankroll.
3x6 Field (33.3% per jump, max x10.94): A step down in per-jump risk, but still high volatility. Six levels provide more opportunity to collect at a meaningful multiplier before risking the upper levels. Players who prefer collecting early (after 2–3 levels) find the 3x6 more forgiving than the 2x3 while still delivering a fast-paced session structure.
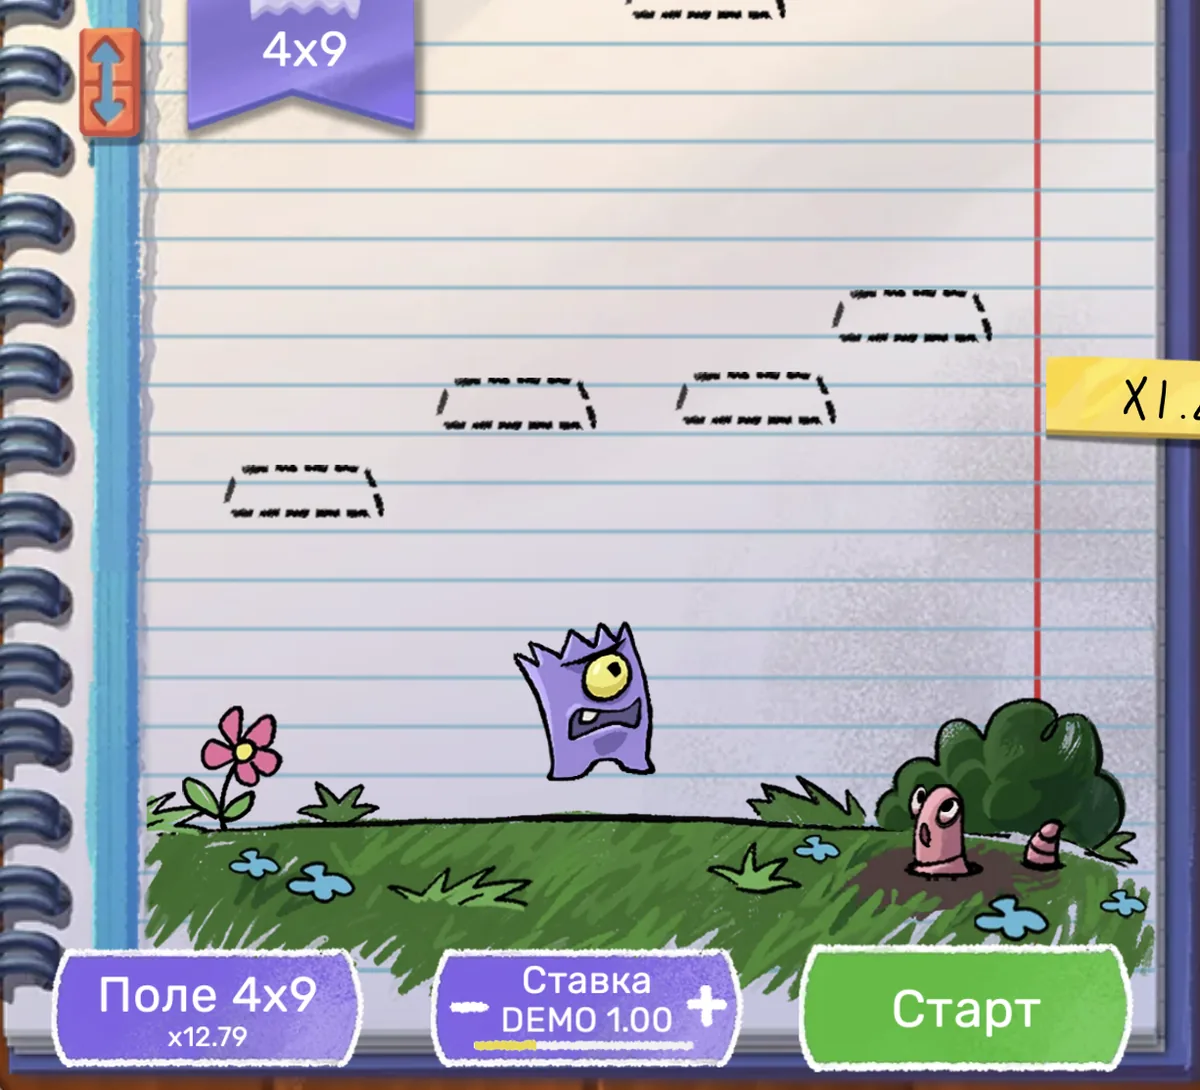
4x9 Field (25% per jump, max x12.79): The most strategically flexible field in doodle-crash. A 25% fail rate is low enough to build multi-level multiplier progression without an extreme cumulative risk. Nine levels allow for meaningful early-collection windows (levels 2–4), mid-range targets (levels 5–7), and high-risk pushes toward the maximum. The 4x9 field is recommended as the primary field for most doodle-crash strategies on this page.
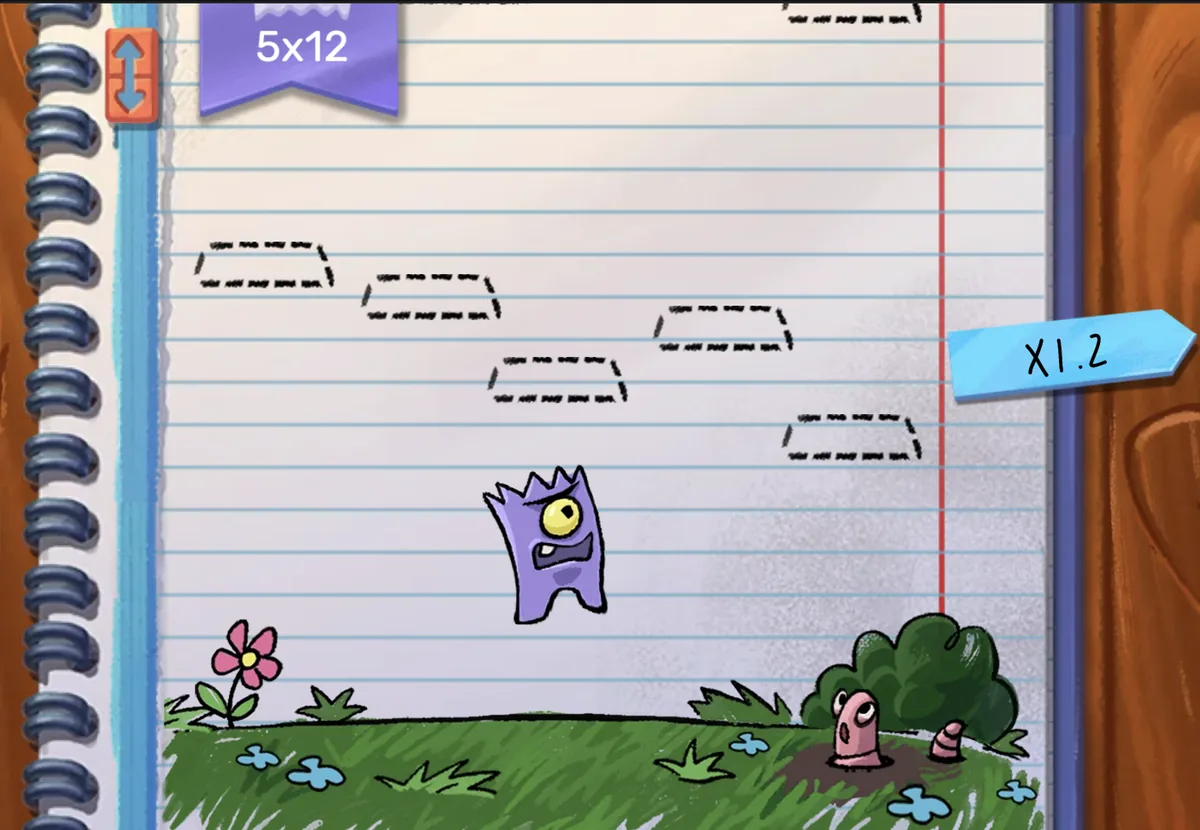
5x12 Field (20% per jump, max x13.97): A lower per-jump fail rate with a twelve-level structure. The 5x12 is ideal for players who want a gradual multiplier climb with frequent early-exit decisions. The 20% fail rate means roughly 4 out of 5 jumps succeed, making the lower levels feel safe — but the cumulative risk of reaching the maximum over 12 levels keeps the game engaging. The x13.97 ceiling is close to the game's theoretical maximum.
6x15 Field (16.7% per jump, max x14.79): Doodle-crash's widest and tallest field. The lowest per-jump fail rate in the game makes individual jumps feel low-risk, but 15 required levels create a long road to the maximum multiplier. The 6x15 is best for patient players with sufficient bankroll to absorb many partial-completion losses at the mid-range levels. It is not recommended for small session budgets where each round's bet represents a meaningful portion of the available funds.
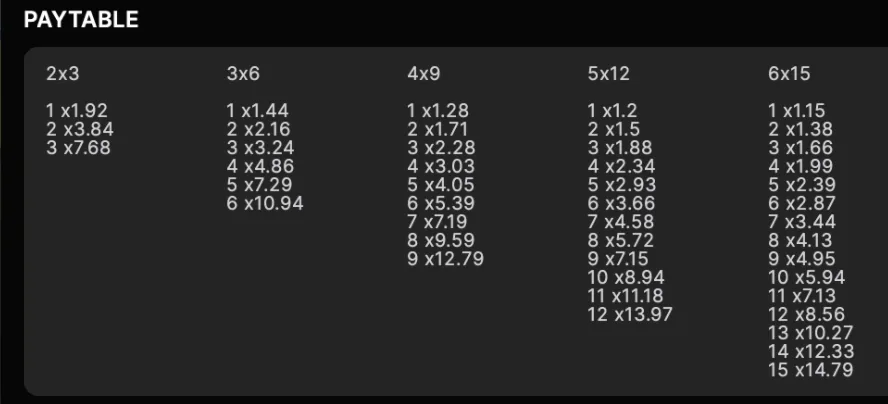
Multiplier Comparison Table — All 5 Doodle Crash Fields
The following table compares all five doodle-crash field sizes across their key strategic metrics: per-jump fail rate, maximum multiplier, number of levels, cumulative probability of reaching the maximum, and the recommended player profile for each field. Use this table to select the field that best matches your session goals and bankroll size.
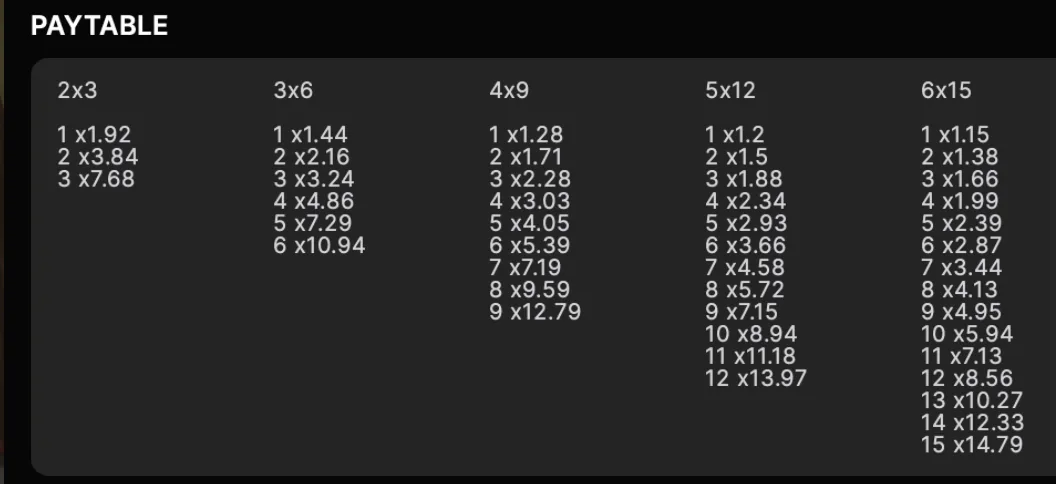
| Field | Columns | Levels | Fail % Per Jump | Max Multiplier | Prob. of Max Win | Best For |
|---|---|---|---|---|---|---|
| 2x3 | 2 | 3 | 50% | x7.68 | ~12.5% | High-risk, fast rounds, large bankroll |
| 3x6 | 3 | 6 | 33.3% | x10.94 | ~8.8% | Moderate risk, early-collect players |
| 4x9 | 4 | 9 | 25% | x12.79 | ~7.5% | Balanced risk/reward — most versatile |
| 5x12 | 5 | 12 | 20% | x13.97 | ~6.9% | Patient players, gradual multiplier build |
| 6x15 | 6 | 15 | 16.7% | x14.79 | ~6.5% | Lowest per-jump risk, longest sessions |
Note that the probability of reaching the maximum multiplier decreases as field size increases, despite the lower per-jump fail rate — because more levels must be survived. The 2x3 field at 12.5% maximum completion probability is statistically more likely to produce a full-grid win than the 6x15 field at 6.5%, but the maximum payout on the 2x3 (x7.68) is less than half the 6x15 maximum (x14.79). Players who want the absolute highest maximum win should play the 6x15 field; players who want the highest probability of ever completing a full grid should play the 2x3 field.
Multiplier Progression Mid-Game
In practice, most doodle-crash players collect before reaching the maximum multiplier. Understanding multiplier progression at intermediate levels is critical for setting realistic collect targets:
Conservative Strategy: Low-Risk, High-Frequency Collect
The conservative approach to doodle-crash prioritizes bankroll preservation and session length over maximum multiplier potential. Conservative play means choosing fields with more columns (4x9, 5x12, or 6x15), setting a low collect target (x1.5–x3), and pressing COLLECT the moment that target is reached regardless of how many levels remain. Over many rounds, conservative play produces small consistent wins that offset losses from rounds where the fake platform appears before the collect target is reached.
Core Principles of Conservative Play
- Choose the 4x9 or 5x12 field. The 25% and 20% per-jump fail rates on these fields are low enough to frequently reach the first 2–3 levels without hitting a fake platform. These early levels produce multipliers in the x1.5–x3 range on most fields — exactly the collect target for conservative play.
- Set a fixed collect target before each round starts. Decide before pressing START whether you will collect at x1.5, x2, or x2.5. Pre-commitment prevents in-round emotional decisions driven by greed.
- Collect at the target — every time. The most important discipline in conservative doodle-crash play is executing the collect the moment the target multiplier appears. Do not extend one more level because "it feels safe." The fake platform does not follow any pattern.
- Use minimum or near-minimum bets. Conservative play with a 0.10–0.20 bet provides the most rounds per session budget and keeps per-round losses manageable when fake platforms appear before the collect target.
- Accept frequent full losses gracefully. Even on the 5x12 field with a 20% per-jump fail rate, a meaningful percentage of rounds will end in a loss at level 1 (before any collect opportunity). These losses are expected and budgeted for.
Conservative Strategy Sample Session
- Field: 4x9
- Bet per round: 0.10
- Collect target: x2.00 (first opportunity at or above 2x multiplier)
- Session budget: 10.00 (100 rounds at 0.10)
- Loss limit: 5.00 (50% of session budget)
- Win target: 20.00 (2x starting budget)
- RANDOM button: Optional — use for hands-off play
With a 75% per-jump success rate on the 4x9 field, you will survive level 1 approximately 75% of rounds. Of those, you survive level 2 approximately 75% again (~56% of all rounds reach level 2). When the collect target appears, you lock in the x2 win regardless of remaining levels.
What to Expect with Conservative Play
Conservative doodle-crash play produces a high frequency of small wins. Sessions feel more stable and longer-lasting than aggressive play. The trade-off is that the maximum possible win per round is capped at your chosen collect target — you will never hit x14.79 with a x2.5 collect discipline. For recreational players whose primary goal is extended entertainment rather than maximum win potential, conservative play aligned with a well-set session budget is the most responsible approach to doodle-crash.
Aggressive Strategy: High-Multiplier Targeting
The aggressive approach to doodle-crash targets high multipliers — typically x5 and above — by continuing to jump past the early collect opportunities that conservative players exit at. Aggressive play accepts a higher rate of total-loss rounds in exchange for occasional large payouts when the creature survives deep into the grid. The house edge of 3.74%–4.17% applies identically to aggressive play; the difference is in variance, not expected value.
Core Principles of Aggressive Play
- Choose the 3x6 or 4x9 field. Aggressive play targeting x5–x10 multipliers typically requires clearing 4–7 levels of the grid. The 3x6 and 4x9 fields offer the best combination of meaningful multiplier progression at the middle levels without requiring 12–15 consecutive jumps to reach the target range.
- Set a high but defined collect target. Aggressive does not mean no target. Before starting a round, set a specific collect threshold — x5, x7, x10 — and commit to it. Collect immediately when the target is reached. This prevents "just one more level" syndrome from pushing a good win into a loss.
- Maintain strict session bankroll limits. Aggressive play produces more total-loss rounds than conservative play. A session budget that covers at least 50–80 rounds at your chosen bet size is the minimum for aggressive play to have statistical meaning. Sessions shorter than 30 rounds are dominated by pure variance rather than strategy.
- Accept that most rounds end in loss. When collecting at x7 on the 4x9 field, you need the creature to survive approximately 6–7 consecutive jumps each at 75% probability. The cumulative probability of that is (3/4)^7 ≈ 13.3%. You will lose approximately 86.7% of rounds before reaching the target — but on the 13.3% of successful rounds, a x7 win on a 1.00 bet returns 7.00.
- Never chase losses by increasing bets. If a session is losing heavily, the correct aggressive response is to stop — not to increase bet size. Higher bets accelerate both wins and losses, but do not change the per-round expected value.
Aggressive Strategy Sample Session
- Field: 4x9
- Bet per round: 0.50
- Collect target: x8 (collect the moment the multiplier reaches or exceeds x8)
- Session budget: 50.00 (100 rounds at 0.50)
- Loss limit: 25.00 (50% of session budget)
- Win target: 100.00 (2x starting budget)
- Expected profile: Many losses of 0.50 each, occasional wins of 4.00+ (x8 on 0.50 bet)
Aggressive Play and the Provably Fair Advantage
Aggressive play benefits particularly from doodle-crash's Provably Fair SHA-256 system. Because aggressive play relies on the game's integrity for high-level survival runs, the ability to independently verify any round that produced an unexpected loss at the x8–x10 level range builds justified confidence in the game's fairness. Unlike non-verifiable casino games, aggressive play in doodle-crash can be audited round by round.
Bankroll Management for Doodle Crash
Bankroll management is the most impactful variable under a doodle-crash player's control. The house edge of 3.74%–4.17% cannot be changed, but how you structure your bets, set session limits, and define win/loss boundaries directly determines how long your session lasts and what outcomes are possible within that session.
Setting a Session Budget
Before opening doodle-crash, decide on a fixed amount you are fully prepared to lose — your session budget. This amount must be disposable entertainment funds only. It must not affect your ability to pay bills, buy food, or meet any financial obligation. Once set, the session budget is immovable — you do not add to it mid-session regardless of outcomes.
- Use only discretionary entertainment money — never essential funds
- Decide the exact amount before starting, not during play
- Once the budget is set, do not increase it under any circumstances
- Treat the budget as the cost of entertainment, like a concert ticket — it may produce no return
- Never attempt to recover a lost session budget by playing additional sessions the same day
Bet Sizing: The Round-Count Rule
In doodle-crash, bet size should be calibrated so that your session budget covers a meaningful number of rounds. Because every round in doodle-crash carries a binary outcome (full loss or collected multiplier), having enough rounds in reserve ensures the session is not entirely determined by variance in the first 10 rounds. A minimum of 50 rounds per session is recommended; 100+ rounds is ideal for strategy testing.
Maximum Bet per Round = Session Budget ÷ Target Round Count
| Session Budget | Max Bet (50 rounds) | Max Bet (100 rounds) | Max Bet (200 rounds) |
|---|---|---|---|
| 5.00 | 0.10 | 0.10 | 0.10 |
| 10.00 | 0.20 | 0.10 | 0.10 |
| 25.00 | 0.50 | 0.25 | 0.12 |
| 50.00 | 1.00 | 0.50 | 0.25 |
| 100.00 | 2.00 | 1.00 | 0.50 |
| 250.00 | 5.00 | 2.50 | 1.25 |
The 0.10 minimum bet in doodle-crash means any session budget of 5.00 or more supports at least 50 rounds. For players with budgets under 5.00, the minimum bet of 0.10 still applies — plan session length accordingly.
Loss Limits and Win Targets
Two additional bankroll boundaries protect your session in doodle-crash:
- Loss limit (50% of session budget): If your doodle-crash balance drops to half of your starting budget, stop the session. Walking away preserves the other half for a future session. This is a discipline rule, not a prediction — some sessions hit the loss limit on the first 10 rounds; others never approach it.
- Win target (2x–3x session budget): If your balance reaches two or three times your starting session budget, consider stopping. The house edge continues to erode winnings over additional rounds — the longer you play after a big win, the closer your session result converges toward the 96.05% RTP average. Locking in a 2x win and stopping is a valid session outcome.
Neither loss limits nor win targets alter doodle-crash's mathematical structure. They impose a behavioral framework that prevents emotional escalation — the primary cause of session losses significantly worse than the house edge would predict on its own.
The Flat-Bet Approach
The simplest and most mathematically sound bet sizing approach for doodle-crash is flat betting — placing the exact same bet on every round for the entire session. Flat betting on doodle-crash means the house edge applies evenly to every round, losses are predictable per round, and winning rounds produce consistent payouts relative to the fixed bet. Progressive systems (Martingale, Fibonacci, etc.) do not improve the expected value in doodle-crash and dramatically increase the risk of large losses during losing streaks.
Provably Fair Advantage: Using Transparency Strategically
Doodle Crash's SHA-256 Provably Fair system does not reduce the house edge or alter the probability of the fake platform appearing at any level. What Provably Fair provides is a strategic advantage through complete transparency — an advantage unavailable in any non-verifiable casino game. Understanding how to use this transparency is a legitimate component of a doodle-crash strategy.

Verifying Game Integrity Across Sessions
The Provably Fair system allows you to verify that doodle-crash is performing at its stated RTP over your personal session history. After a session with an unusually poor outcome, you can access the HASH data for every round played and verify independently that each round's outcome was committed before you placed your bet. If the hashes consistently verify, you can confirm the session's losses were within the range of normal variance — not the result of manipulation. This knowledge supports continued play within rational budgets rather than abandoning a legitimate game due to a normal variance streak.
Choosing Trustworthy Casino Platforms
The Provably Fair system in doodle-crash functions correctly only when played through a casino platform that honestly implements the server-side seed generation. A dishonest platform could theoretically serve a compromised version of doodle-crash. The strategic implication: always play doodle-crash at licensed casinos (Curacao eGaming, MGA, or equivalent) where the Provably Fair implementation can be compared against the official game version (1.0.4). Licensed casinos offering doodle-crash include 1Win, Pin-Up Casino, Fresh Casino, LuckyStar Casino, Casino Gold, and Drip Casino. Verify licensing status before depositing real money at any platform.
Using History Data for Session Analysis
The doodle-crash history panel (accessible via MENU) provides a full record of every completed round. Strategically, this data serves three purposes:
- Session P&L tracking: Calculate your total bets vs. total collected winnings to see your actual return percentage against the theoretical 96.05% RTP.
- Collect discipline review: Compare your intended collect targets (set pre-round) against your actual collect behavior. Players who consistently hold past their target are identifying an emotional discipline issue, not a strategy issue.
- Variance verification: Use Provably Fair hash data from specific rounds to confirm that unexpected losses were random outcomes of a fair process, not anomalies requiring a different strategy response.
Common Mistakes to Avoid in Doodle Crash
The following mistakes are the most common causes of sessions that significantly underperform the expected mathematical loss in doodle-crash. Each one is avoidable with pre-session planning and in-session discipline. None of these mistakes involve bad luck — they are behavioral patterns that compound losses beyond what the 3.74%–4.17% house edge would produce on its own.
1. Not Setting a Collect Target Before Pressing START
Playing doodle-crash without a pre-committed collect target leaves the collect decision entirely to in-round emotions. When the creature is on level 6 of a 9-level grid with a x4 multiplier visible, the temptation to push for x8 is intense regardless of whether that was the plan. Players who set collect targets before each round and execute them mechanically outperform players who decide during the round — not because of better odds, but because of better loss-control discipline.
2. Choosing the 2x3 Field with a Small Bankroll
The 2x3 field's 50% per-jump fail rate means approximately half of all rounds end in a total loss on level 1. With a small session budget covering fewer than 30 rounds, this creates a very high probability of complete budget depletion before any meaningful positive variance occurs. Players with modest budgets should use the 4x9 or 5x12 field to extend session length and give the RTP statistics room to operate.
3. Chasing Losses by Increasing Bet Size
After a losing streak in doodle-crash, doubling or tripling the bet to "recover" is the single most destructive behavioral error available. Every round in doodle-crash is independent — the fake platform position on round 21 has no mathematical relationship to rounds 1 through 20. Doubling your bet after losses applies a larger stake to a round with the same underlying expected value as every other round, while also exposing more capital to the same binary loss/win structure. Flat betting is always the correct response to a losing streak in doodle-crash.
4. Treating RANDOM as a Strategy Tool
Some players believe that using the RANDOM button more or less often affects outcomes. It does not. RANDOM uses the same SHA-256 provably fair process as manual platform selection and produces the same statistical probability per jump. Whether you manually pick a platform or press RANDOM, the per-jump fail rate is identical and determined entirely by the committed seed from the moment you pressed START.
5. Playing Past the Loss Limit
Setting a loss limit of 50% of session budget is standard bankroll management advice for doodle-crash. The most common failure mode is reaching the loss limit and continuing anyway — either because of a "feeling" that a win is due, or because the session budget is treated as an incremental allowance rather than a hard stop. The house edge of 3.74%–4.17% applies to every additional round played past the loss limit. There is no statistical benefit to continuing after a pre-set stop point is reached.
6. Expecting Provably Fair to Mean More Wins
Provably Fair in doodle-crash means the outcome cannot be manipulated — it does not mean the outcome is favorable. A Provably Fair verified round that ends with the fake platform on level 1 is a confirmed fair loss. The SHA-256 system guarantees honesty, not wins. Using Provably Fair as a confidence signal for the game's integrity is correct; expecting Provably Fair to produce better results than the stated house edge would suggest is a misunderstanding of the technology.
7. Playing Too Many Rounds Without Breaks
Extended doodle-crash sessions without breaks increase the probability of emotional decision-making — particularly the tendency to extend collect targets after several consecutive losses. Scheduling regular breaks (every 30–60 minutes) allows time to reassess session progress against your original budget and targets without the cognitive pressure of an active game session influencing judgment.
8. Misreading the Multiplier Table as a Pattern
The multiplier progression in doodle-crash increases predictably level by level within a given field. This predictability is structural — it tells you what multiplier you will receive if you survive to that level. It does not tell you anything about the probability of surviving to that level on any specific round. The fake platform position at each level is determined independently by SHA-256 on every new round. There is no detectable pattern in fake platform placement, and no amount of history review will reveal one.
Optimistic Strategy Outlook
Doodle-crash has a useful strategic advantage because its risk is visible in the field layout. The 2x3 board gives fast, high-pressure rounds, while the 4x9 and 5x12 fields create more room for planned collection targets, and the 6x15 field lowers per-jump failure at the cost of patience. That structure is encouraging for players who want a repeatable plan: pick one field, write down the collect point, keep the bet flat, and stop when the loss or win boundary is reached. The SHA-256 provably fair system does not improve RTP, but it does support trust that the chosen plan is being tested against real random outcomes.
The optimistic version of doodle-crash strategy is steady and unemotional. Demo mode can show whether RANDOM or manual selection feels better, while real-money play should focus on small stakes and no mid-session field switching. The house edge still applies, but the player can control the number of rounds, the stress level, and the quality of each decision.
Frequently Asked Questions About Doodle Crash Strategies
No single field in doodle-crash has objectively superior odds — all five fields share the same RTP range of 95.83%–96.26%. The 6x15 field has the lowest per-jump fail rate (16.7%) but requires surviving 15 consecutive jumps to reach the x14.79 maximum. The 4x9 field (25% fail rate, x12.79 max) is the most strategically versatile and is recommended for most players as the best balance of multiplier potential, manageable per-jump risk, and reasonable session length. Players who prioritize session length and frequent early-collect wins should use 5x12 or 6x15. Players who want fast, high-volatility rounds should use 2x3 or 3x6.
No strategy can eliminate doodle-crash's built-in house edge of 3.74%–4.17%. The SHA-256 Provably Fair system produces independent, unpredictable results on every round — past outcomes have no bearing on future ones. What strategy can accomplish in doodle-crash is more limited but still valuable: disciplined field selection matches your risk tolerance to the game's structure; pre-committed collect targets prevent emotional overstaying; bankroll management extends sessions and reduces catastrophic single-session losses. Strategy in doodle-crash is about managing the mathematical reality responsibly, not overcoming it.
The most sustainable collect approach in doodle-crash is to pre-commit to a specific multiplier target before each round and collect the moment that target is reached — regardless of in-round temptation to continue. Conservative players set targets of x1.5–x3 and collect frequently for small consistent wins. Aggressive players set targets of x5–x10 and accept many total-loss rounds in exchange for larger payouts when the target is reached. Both approaches are mathematically valid across a large enough sample of rounds. The worst approach is deciding collect timing in-round without a pre-set target, as this consistently leads to holding past rational exit points.
The Martingale system — doubling your bet after every loss — does not work in doodle-crash. The house edge of 3.74%–4.17% applies to every single round regardless of bet size. Doubling bets after losses accelerates bankroll depletion during losing streaks, which are statistically inevitable. A sequence of just 7 consecutive losses starting at 0.10 would require a bet of 12.80 on the 8th round to "recover," and nothing in doodle-crash guarantees that the 8th round will be a win. Progressive betting systems do not improve expected value in provably fair games — they only restructure when the inevitable expected loss occurs.
Doodle Crash's SHA-256 Provably Fair system does not change the mathematical house edge, but it provides a strategic advantage through complete transparency: you can verify any round was not manipulated, build justified confidence in the game's integrity over a session, compare your personal session return against the stated 96.05% RTP average using verified data, and confirm that losing streaks were the result of normal variance in a fair game rather than manipulation. This transparency-based confidence supports rational bankroll decisions rather than emotional responses to losing streaks.
A practical session structure for doodle-crash is a minimum of 50–100 rounds to give the RTP statistics room to operate and to give your strategy enough repetitions to produce meaningful results. At the 0.10 minimum bet, a 10.00 session budget supports 100 rounds. Set a session budget that covers your planned round count at your chosen bet size before starting. Stop when the budget is spent or when you reach a pre-set win target — do not extend the session because "things were going well" or because you want to recover losses. Session discipline is as important as field selection and collect targeting in doodle-crash.
No. The RANDOM button in doodle-crash produces statistically identical results to manual platform selection. Both use the SHA-256 committed seed to determine platform outcomes. There is no "hot" or "cold" column on any level — the fake platform position is determined by the seed at the start of the round, not by any pattern observable to the player. Use RANDOM if you prefer hands-off play or want to remove choice-related anxiety; avoid it if you find manual selection more engaging. The strategic choice between RANDOM and manual selection has zero impact on expected outcomes.
Your Learning Path
Five steps to confident play — your current position is highlighted. Follow the sequence, or jump to the step that's most useful right now.